Get Creative: How to Dye Easter Eggs with Toddlers and Kids

Get Creative: How to Dye Easter Eggs with Toddlers and Kids
Easter is just around the corner, and that means it's time to dye some eggs! Dyeing Easter eggs is a fun and creative activity that toddlers and kids can enjoy with their families.
It's a great way to spend quality time together while indulging in some Easter festivities. I was on NBC Chicago Today demonstrating ideas last year.
If the Easter Bunny needs Easter basket ideas, be sure to check out this post. It features small toys and the best stuffers for plastic easter eggs for little kids and older kids. Plus, it shares my favorite sensory bin from Learning with Kelsey.
How to plan crafts with your toddlers & kids
Preparation is key! Plan the crafts in advance and prep your materials. If you have time, test one on your own to see how long it takes. I've realized my kids can stay engaged for 4-5x the multiplier of their age. For my 1 year old son, that's 4-5 minutes. For my 4 year old little girl, that's 16-20 minutes. After that, I consider it bonus time.
Egg Hunt Ideas
If you're planning an egg hunt with your busy toddler, you could use these eggs below. However, I'd recommend plastic easter eggs so that you can fill them with some surprises. I would mix in some larger eggs with your toddler's easter eggs for some fun surprises. If you're planning an evening egg hunt, be sure to check out my glow in the dark egg hunt with glow sticks here.
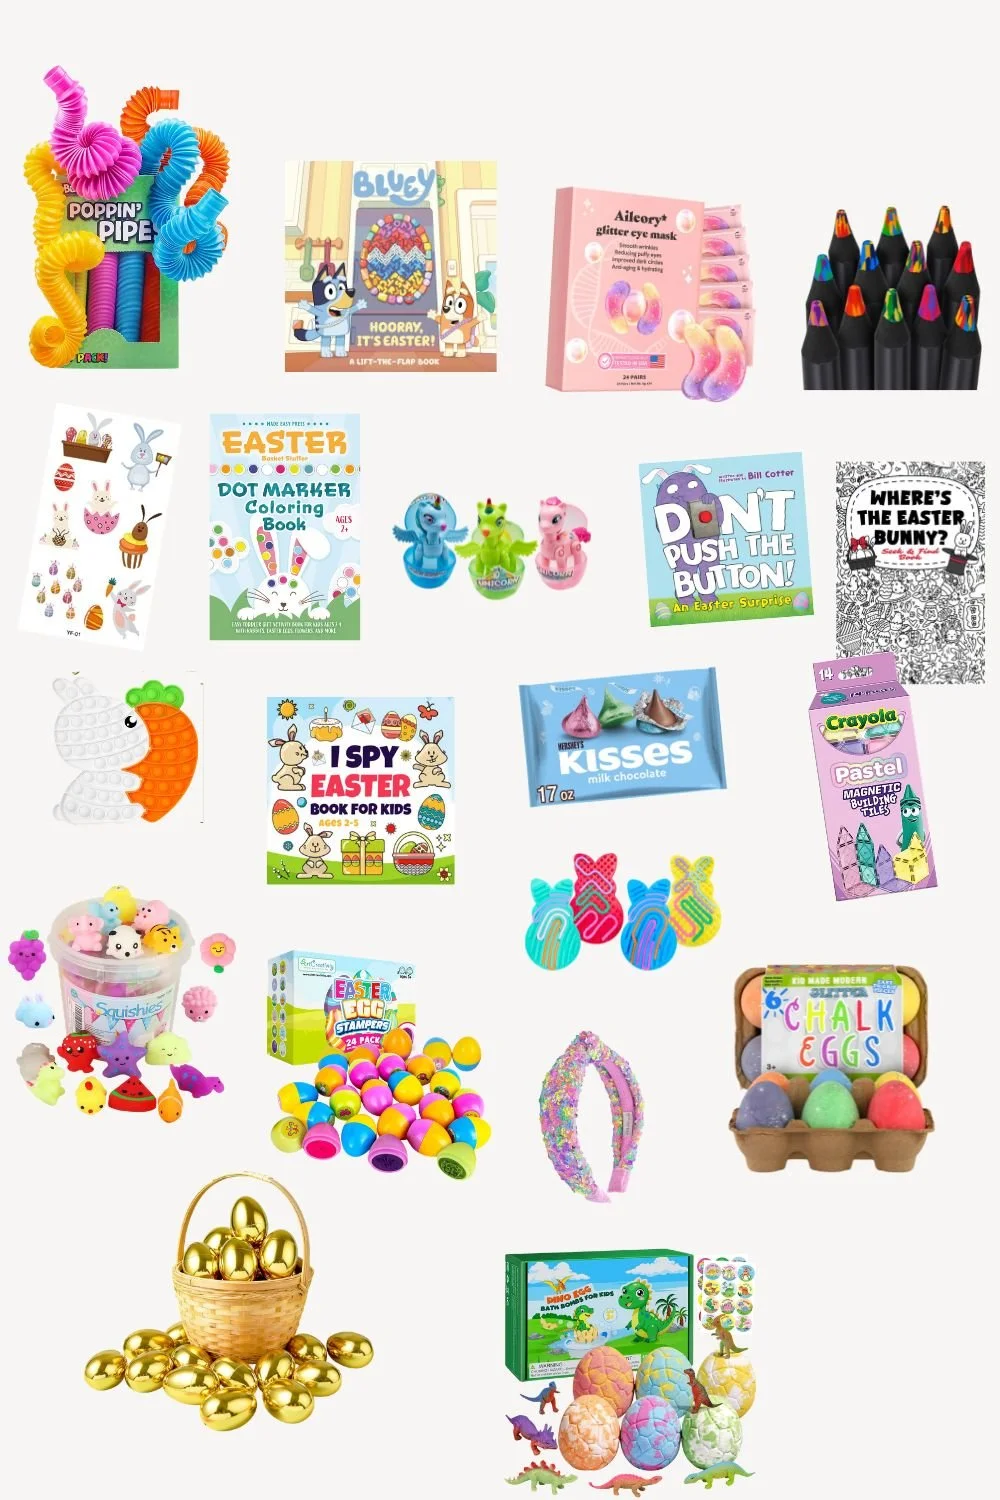
shop the post

Easter Egg Tokens
This is one of my favorite non-candy ideas for egg hunts. They have really fun family activities and independent activities for kids.

Plastic Easter Eggs with Golden Eggs
I LOVE a golden egg hidden with a few dollars. It’s so fun for everyone.

Hershey’s Polka Dot Eggs
If you’re going to buy candy, I love to get things that are exclusive to the season like these cookies ‘n creme polka dot eggs.

Giant Golden Egg
If you want to win Easter Bunny of the year, you need this giant golden egg. You can fit small toys in this giant egg or loads of Easter candy.

Starburst Jelly Beans
These are the best jelly beans on the planet! It’s an absolute must-have that I buy them every year for the kids (and myself)!

Pre-filled Easter Eggs
If you really want to hit the easy button, you can buy your eggs pre-filled! This is definitely ideal if you’re short on time or just want candy filled eggs for your toddler’s easter basket.

Nee Doh Chicka Deedo's
These are definitely the new fidget toy! These squishy guys are about the size of an Easter egg and would be a fun addition to any hunt.

Kinetic Sand Eggs
If you’re into sensory play, it’d be fun to hide a few of these around your egg hunt, too!
Here are a few other creative ideas for your egg hunt easter activities for young toddlers & older toddlers.
Fruit snacks (helps to avoid sugar overload!)
Alphabet magnets
Matchbox cars
Finger puppets
Chocolate eggs
Fidget Toys
Play Dough
Piece of candy
Jelly beans
Mini bubbles
Hair bows
Hair clips
Temporary tattoos
All of these small items make fun easter egg fillers. I also have great Easter gift ideas here. I like to do a small hunt Easter morning for the kids to find their Easter baskets.
In general, what materials do I need to dye Easter eggs with toddlers and kids?
Dyeing Easter eggs with toddlers and kids can be a fun and exciting activity. It is important to ensure that the materials used are safe and appropriate for children.

Here are the materials you need to dye Easter eggs with toddlers and kids:
Hard-boiled eggs:
The first and most important material you need is hard-boiled eggs. Ensure that the eggs are fully cooked and cooled before allowing the children to handle them.
Food coloring:
Food coloring is the most common material used to dye Easter eggs. It is safe for kids and comes in a variety of colors. You can use liquid or gel food coloring, depending on your preference.
Vinegar:
Vinegar is an essential material when dyeing Easter eggs. It helps to set the color and ensures that the dye adheres to the eggshell. You can use white vinegar or apple cider vinegar.
Water:
You will need water to dilute the food coloring and vinegar. Ensure that the water is at room temperature to avoid cracking the eggshells.
Bowls or cups:
You will need bowls or cups to mix the dye solution. Ensure that they are large enough to hold the eggs and allow children to dip them easily.
Spoon or tongs:
You will need a spoon or tongs to handle the eggs. This will prevent children from accidentally dropping them and making a mess.
Paper towels or a drying rack:
Once the eggs are dyed, they need to dry. Put the eggs on either a paper towel or a rack. Let them dry fully before dealing with them or embellishing them further.
Remember to plan ahead, manage your expectations, and most importantly, have fun!
Mess-free Easter Egg Dying: Rice Shake in Ziploc Bags
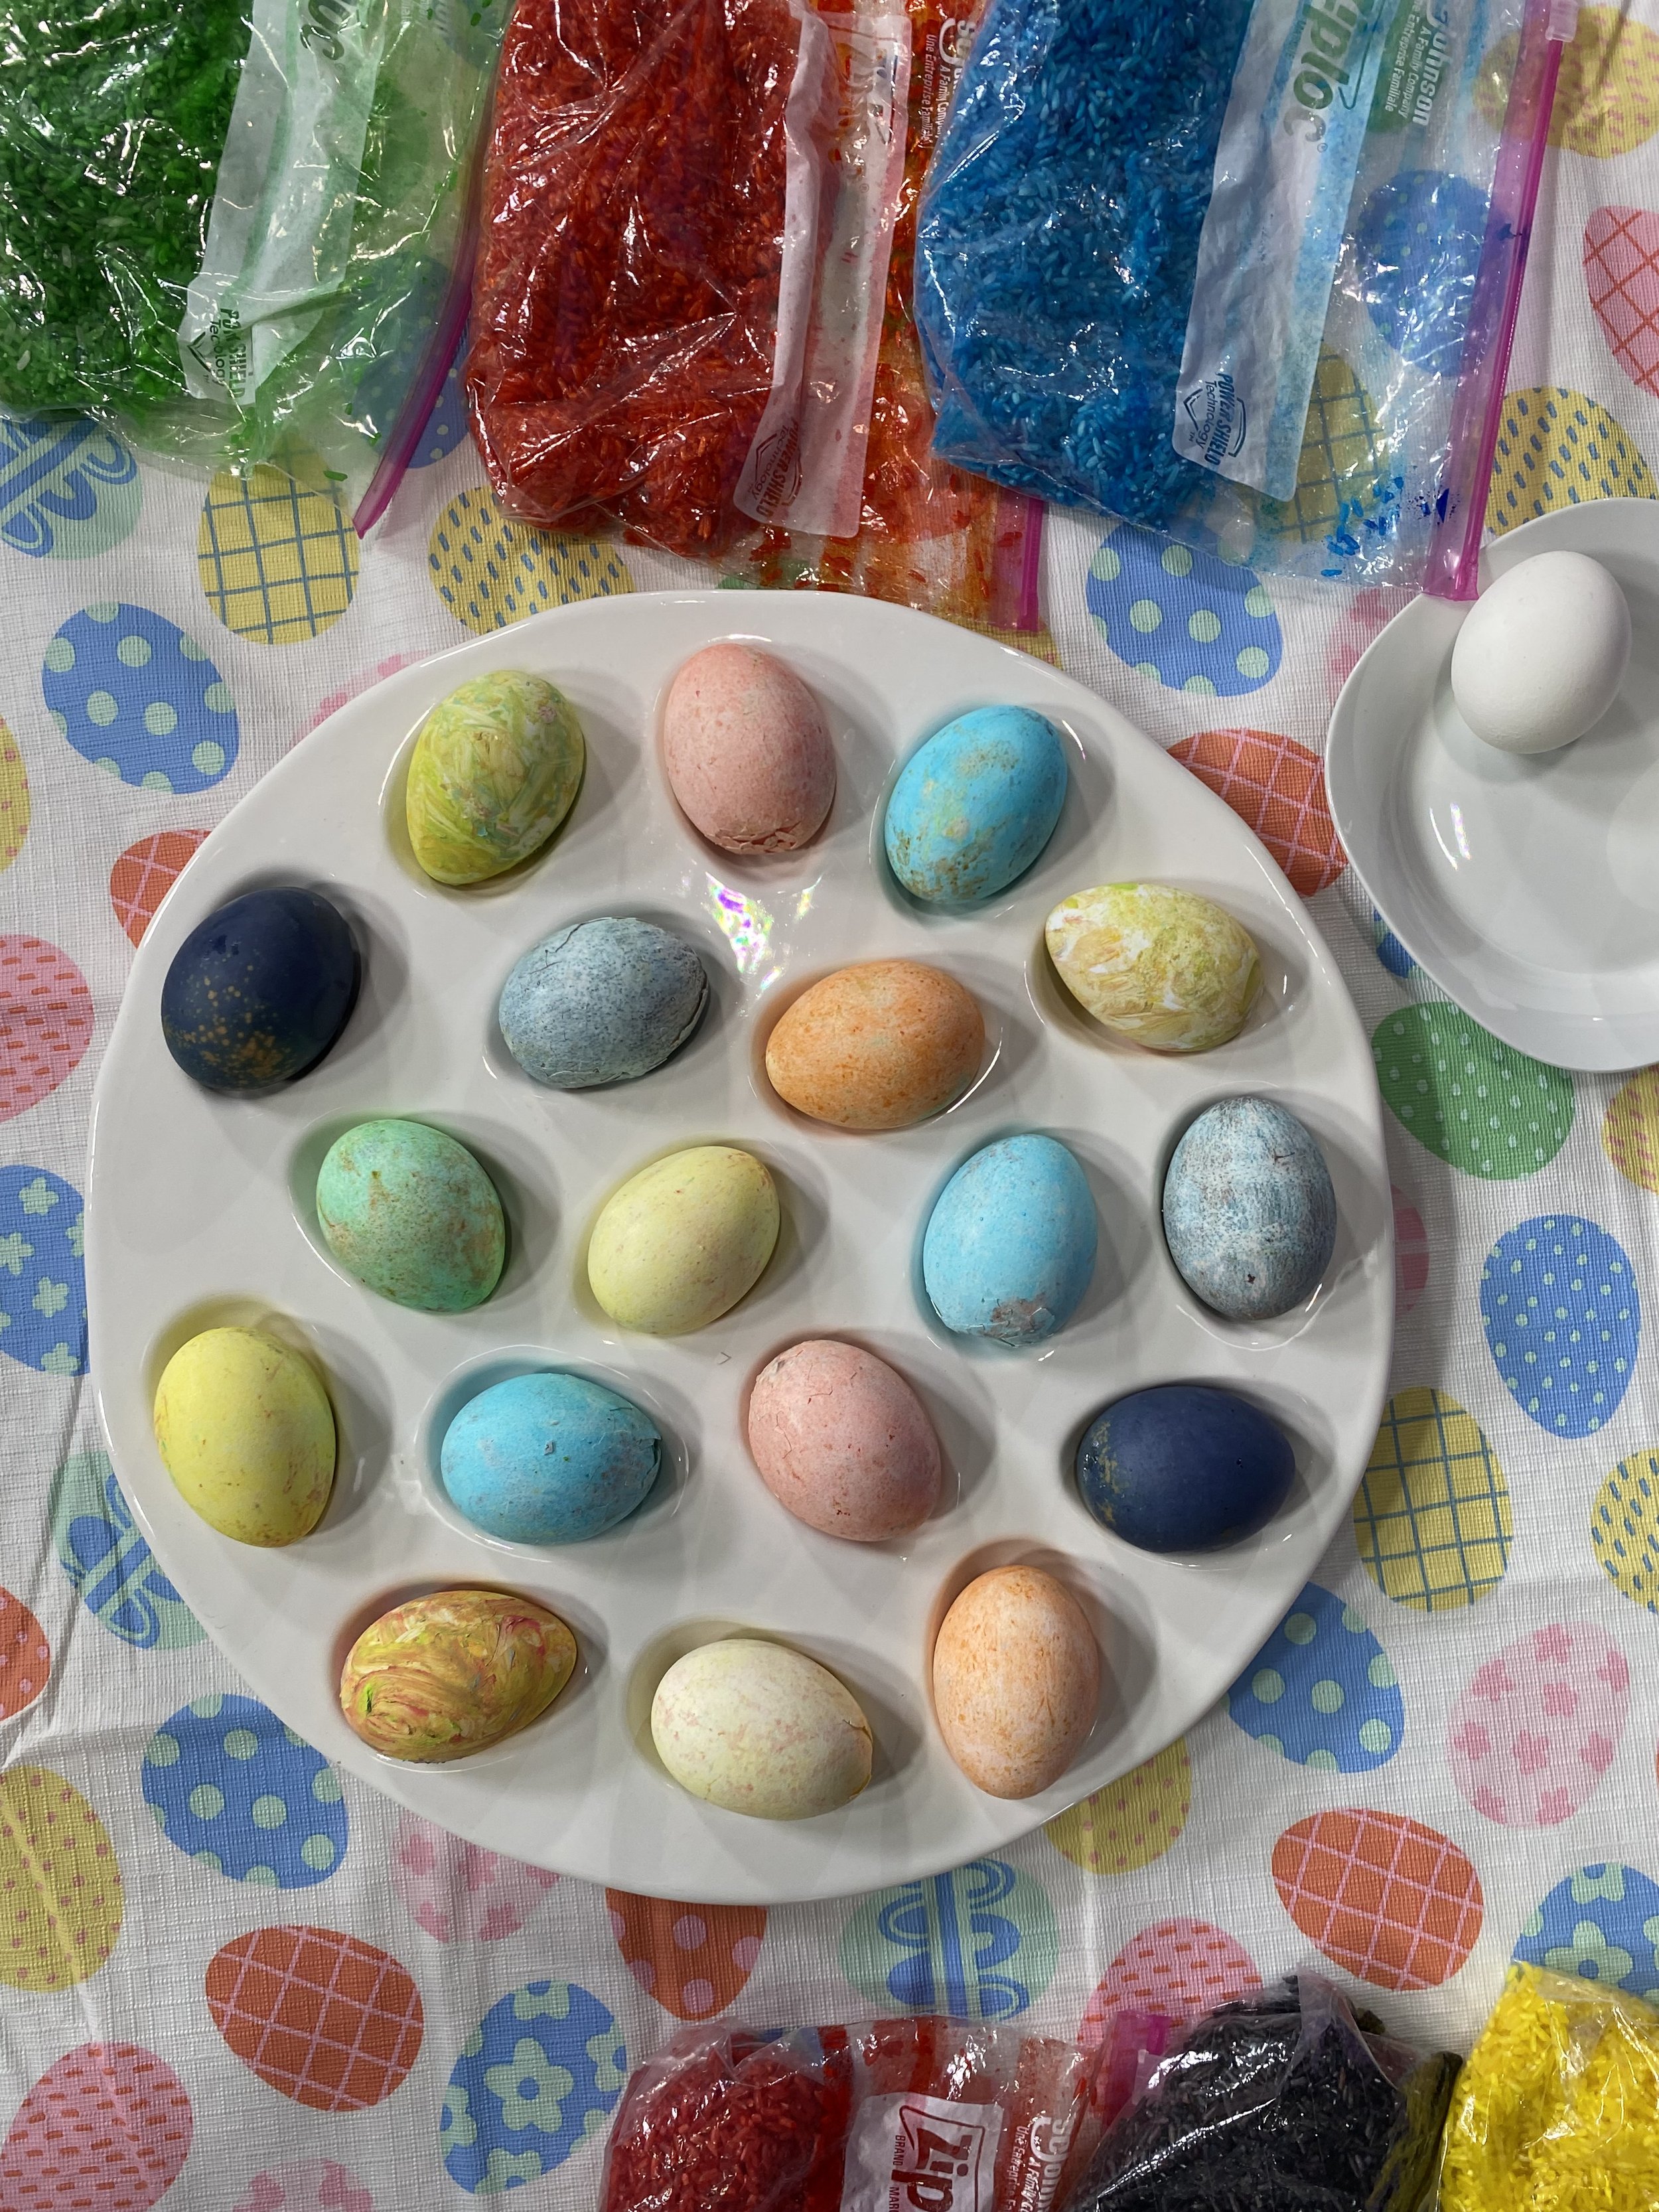
This is my new favorite way to dye Easter eggs. I initially found the idea from Crafty Morning. It was truly mess-free, so fun and worked on fine motor skills with my toddler.
This activity is truly mess-free Easter egg dye. For this activity you'll need:
A box of food coloring
6-10 ziploc bags (depending on how many colors you want to create)
12+ Hardboiled eggs
2lbs of rice
I'd highly recommend setting this up in advance of engaging your toddler. Remember, you have about 5-20 minutes to keep their attention.
Here are the steps to follow:
Prep each ziploc bag with 2 cups of rice.
Hard boil your eggs and let cool
Set a tray aside for your eggs to dry.
Engage your little one, and add 20 drops of food coloring to each ziploc bag. (This is a great way to practice counting!) Remove the excess air and zip the bag shut. Massage the bag to turn the rice the color that you used.
Drop an egg gently in the bag, seal the bag and gently shake for 2-3 minutes. I had the best success by rubbing the rice onto the egg.
Unzip the bag, slowly slide the egg onto your drying tray. Careful, the egg will be wet with food coloring dye!
Repeat for additional eggs.
How long do I need to wait for the eggs to dry once they are colored?

Once you have finished coloring your eggs, it is important to let them dry completely before handling them. The amount of time it takes for a dye to dry can be affected by the type of dye, the temperature of the space, and the amount of moisture in the air.
In general, it is recommended to let the eggs dry for at least 30 minutes to 1 hour before handling them. However, if you want to be sure that the eggs are completely dry and avoid any smudging or smearing, it is best to wait for 2-3 hours or even overnight.
To speed up the drying process, you can use a hairdryer on a low setting to blow dry the eggs. Be sure to hold the hairdryer at least 6 inches away from the eggs to avoid cracking them.
Remember that the key to achieving vibrant and long-lasting colors on your eggs is to allow them to dry completely before touching or handling them. Patience is key when it comes to dyeing Easter eggs, so take your time and enjoy the process!
Natural Easter Egg Dyes: Dying Easter Eggs with Blueberries and other food

For those looking for a more natural approach to Easter egg dying, using fruits and vegetables can create beautiful and unique colors. Blueberries, beets, and turmeric are just a few examples of natural materials that can be used to dye eggs. If you plan on eating the eggs, this is a much better way to do it than the other dye kits on the market.
What you'll need to dye Easter eggs with blueberries:
1 pint of blueberries
1 cup of water
1 tablespoon of vinegar
12+ eggs, hardboiled
How to dye Easter eggs with blueberries

Start by boiling 1 cup of blueberries with 1 cup of water and 1 tablespoon of vinegar. Once the mixture has boiled, strain out the blueberries, leaving just the liquid. Let the liquid cool to room temperature before placing the eggs in the mixture.
Hard boil a dozen or more eggs .
Create cups with the mixture. Tasting glasses like these work well.
Drop the eggs into the dye mixture -- gently because it'll splash! The longer you leave the eggs in, the darker the color will be.
Optional -- if you want to create fun designs, wrap rubber bands around the eggs and then drop them into the mixture.
Other natural Easter egg dyes from fruits and vegetables

Other natural dyes can be made with beets, which will create a deep pink color, or turmeric, which will create a bright yellow color. To make the dye, boil the chosen vegetable or spice with water and vinegar, strain out the solids, and let the liquid cool before adding the eggs. These natural dyes may take longer to penetrate the eggshell and create a color, so patience is key.
With these creative options for Easter egg dying, you and your children can enjoy a fun and unique activity while making beautiful decorations for the holiday. Remember to always supervise children when handling dye and eggs, and have a great time exploring your creativity together.
No-dye Easter Egg Ideas: Paint Easter eggs
Another fun and creative way to decorate Easter eggs is by painting them. Children can use their imaginations to create unique designs and patterns, and the finished product can be just as beautiful as dyed eggs. All you need are some plain hard-boiled eggs and acrylic paint, and you're ready to let your creativity soar. Remember to let the paint dry completely before handling the eggs to avoid smudging or smearing.
If you opt for this approach, be sure to lay down a mat and wear a paint shirt. Kids can use paint brushes or finger paint onto the eggs. For this approach, you can use hard boiled eggs or for a less expensive approach, use cardboard or wooden eggs from your local craft store or Target.
Other creative ways to dye Easter eggs with kids
There are so many creative ways to dye Easter eggs than just the traditional Paas kit.
Use shaving cream to dye Easter eggs
Looking for a fun and unique way to dye Easter eggs with your children? Why not try using shaving cream! This method is not only easy, but it also creates beautiful marbled designs on the eggs that will impress everyone.
To get started, you'll need hard-boiled eggs, shaving cream, food coloring, a baking sheet, and a toothpick. Begin by spraying a layer of shaving cream onto the baking sheet, making sure that it's thick enough to hold the eggs. Next, add drops of food coloring onto the shaving cream, using a toothpick to swirl the colors together.
Once the colors are swirled to your liking, roll the hard-boiled eggs in the shaving cream mixture, making sure that they're coated evenly. Let the eggs sit in the mixture for about 10-15 minutes, allowing the shaving cream to dry.
After the time has elapsed, gently wipe off the shaving cream with a paper towel, revealing the beautiful marbled design on the eggs. Rinse the eggs under cold water to remove any excess shaving cream and let them dry.
This method is not only a fun and creative way to dye Easter eggs, but it also allows children to experiment with different color combinations and designs. Plus, the shaving cream easily washes off and won't stain your clothes or countertops.
In conclusion, using shaving cream to dye Easter eggs is a fun and unique activity that both you and your children will enjoy. So, gather your supplies, get messy, and let your creativity run wild! Whether you choose to use the traditional Paas kit or experiment with shaving cream, dyeing Easter eggs with your kids is a wonderful way to spend quality time together and create lasting memories. So, embrace the mess and have fun this Easter season!
Try melted crayons for Easter egg dye
Looking for a creative and unique way to dye Easter eggs with your children? Try using melted crayons! This method is not only easy and fun, but it also creates stunning designs on the eggs that will impress everyone.
To get started, you'll need hard-boiled eggs, crayons in various colors, and a heat-resistant surface. Begin by melting the crayons in a small pot over low heat on the stove. Once the crayons have melted, use tongs to hold the egg and dip it into the melted crayon mixture. You can also use a paintbrush to apply the melted crayon to the egg in a more controlled manner.
Experiment with different color combinations and designs to create unique and personalized Easter eggs. You can even draw on the eggs with a white crayon before dipping them into the melted crayon mixture to create a resist effect.
Once the eggs are covered in the melted crayon mixture, let them dry on a heat-resistant surface. You can also place them in the fridge to speed up the drying process.
This method is a great way to involve children in the Easter egg dyeing process and allows them to flex their creativity and imagination. Plus, the melted crayon easily washes off and won't stain your clothes or countertops.
In conclusion, using melted crayons to dye Easter eggs is a fun and creative activity that both you and your children will enjoy. So, gather your supplies, get messy, and let your creativity run wild!
How can I create fun and creative Easter egg designs?
Easter egg decorating is a beloved tradition that has been enjoyed for generations. While the classic method of dying eggs is always a popular choice, there are many ways to create fun and creative Easter egg designs that will impress your family and friends. Here are some tips to help you get started:
Experiment with Different Techniques: There are many different techniques you can use to decorate eggs. Some popular methods include using stickers, washi tape, paint, and markers. Try experimenting with different techniques to create unique designs.
Use Bright Colors: Easter is a time of year when bright colors are popular. Consider using vibrant colors like pink, yellow, and green to create a fun and festive design.
Create Patterns: Patterns are a fun way to add interest to your Easter egg designs. Some popular patterns include polka dots, stripes, and chevron. You can create these patterns using stickers, markers, or even a small paintbrush.
Add a Theme: Another great way to make your Easter egg designs more creative is to add a theme. You could create eggs that feature your favorite sports team, or eggs that look like your favorite animals. The possibilities are endless!
Get Creative with Materials: Don't limit yourself to traditional Easter egg decorating materials. Consider using different materials like glitter, sequins, or even feathers to add some extra flair to your designs.
Are there any special techniques that work best for coloring Easter eggs with toddlers and kids?
As a professional in child development and education, I am happy to provide expert advice on the best techniques for coloring Easter eggs with toddlers and kids. There are a few key tips that can help make this activity fun, safe, and successful for everyone involved.
First and foremost, it is important to choose age-appropriate materials and tools. For young children, non-toxic and washable paints or markers are a good choice, as they are easy to control and less messy than other options.
For older children, traditional egg dyes or natural dyes made from fruits and vegetables can be a fun and creative way to explore color mixing and experimentation.
Another important factor to consider is the setup and environment.
Providing a designated workspace with plenty of newspaper or paper towels to protect surfaces and avoid spills is crucial. Have a range of egg decorating tools ready.
Examples include stickers, stencils and rubber bands. These tools will give texture to the eggs.
In terms of technique, there is no one right way to color Easter eggs with toddlers and kids. Some children may prefer to dip the eggs in dye or paint. Others may enjoy using a brush or sponge to create unique patterns and designs. Encouraging children to experiment and explore their own creativity can lead to some truly beautiful and unique results.
Are there any age-appropriate games or activities that I can play while dyeing the eggs?
Yes, there are plenty of age-appropriate games and activities that you can incorporate while dyeing Easter eggs. Here are a few ideas:
Egg Hunt - Before dyeing the eggs, hide them around the house or yard for the kids to find. This will not only be a fun activity but also add an element of surprise to the egg-dyeing process.
Exciting Egg Games - Play a few games that involve eggs, such as egg rolling, egg relay race, or egg toss. These games are not only fun but also a great way to build teamwork and coordination skills.
Egg Decorating Contest - Turn egg decorating into a friendly competition by having a decorating contest. Give prizes for the most creative, funniest, or most intricate designs.
Egg Storytelling - Encourage each child to create a story about their egg, whether it be a character or a scene. Have them share their story with the group once they have finished dyeing their eggs.
Egg Character Role Play - Have children create characters out of their eggs and act out a short play or story. This activity will help children build their creativity and imagination.
Remember, when incorporating games and activities, it's important to ensure that they are age-appropriate and safe for the children involved. With a little creativity, you can make egg-dyeing a fun and memorable experience for everyone involved.


Hi, I’m Jen!
Hi, I’m Jen, your perpetually optimistic, fun-loving, witty friend. When I’m not working at The Marketing Greenhouse, you can find me gardening in the sun, playing games with my kids or creating content that inspires people to try new things and be the best version of themselves.